Category Archives: fun Foods

Natural Red Dye Easter Eggs

One of the many traditions for Greek Easter is the coloring of all the boiled eggs red. In the Greek religion the Easter eggs are used to symbolize the blood of Christ. There is a game played at Easter called Tsougrisma. Each player gets a red egg. One player will gently tap the egg of another player. The winner is the one whose egg does not crack. This player will go on to play others. The winner is the one who successfully cracks the eggs of the other players. It is said that this will bring good luck to the winner through out the year. These are important traditions to my Greek heritage mother, so I did a little research. My maternal grandmother came to the United States early in the 20th Century from a small fishing village in Greece. In that small town they didn’t have access to red dyes. I discovered that the traditional way to dye the Easter Eggs was with a natural dye made from yellow onion skins. This method yields a deep rich byzantine red color, like the color that you find in many of the religious Greek icons. It’s the perfect color, the color of my mom’s childhood and it’s all natural. I suggest trying this out. You boil your eggs in the dye and you can save the dye to color more eggs, I kept it in a plastic container in the fridge. Have fun coloring your Greek Easter eggs!

blog red eggs
Red Easter Eggs
Makes 6 eggs
6 white eggs, room temperature
skins of 6 large spanish or yellow onions
3 cups water
2 tablespoons white vinegar
1/8 teaspoon fine sea salt
1 teaspoon olive oil
In a medium ( 6 1/4 inch) sauce pan add the onion skins, water and vinegar. Bring to a boil. Reduce heat to simmer and place cover on the pan. Let simmer for 30 minutes.  Remove from heat and strain dye into a bowl and cool. The dye will appear orange, but it will yield red eggs. In the same medium sauce pan add the eggs in one layer. Cover with the cool liquid and add the salt. The eggs should be completely covered , if not add a little water until they are. Bring this to a low boil, reduce heat and cover the pan. Simmer no longer than 15 minutes. Remove from heat. Using a skimmer remove eggs and place on a wire rack to dry. Once dry, use a paper towel to rub olive oil on the eggs to give a glossy finish. Keep refrigerated until ready to serve. Serve cold or room temperature

Guacamole Days

It’s been a long winter here in the northeast which has moved into a pretty cold spring, but never the less summer is heading our way. Each year I select a weekend in May, usually two weeks before memorial day, which is designated the kickoff of the summer season, regardless of temperature. The deck furniture and accessories are out, the pool is just open and it’s time to dine out of doors. As I invite my guests the first question after accepting the invitation is : what are you making ? The second question is : are you making guacamole? I don’t know what it is about summer and guacamole but it’s the perfect starter for sitting on the deck watching the boats go by and sipping a lovely cocktail.
From by the bay wishing you great food memories!
Maryann
blog guacamole1


Here are a few quick tips for making the perfect guacamole:
1. Make it Ripe! Always use ripe avocados, I prefer  Haas. When selecting your avocado it is important that they are ripe, so that you can mash them easily. When you select your avocado test it for ripeness by squeezing the bulbous end of the avocado to make sure it yields to the touch. When you cut the avocado, do so length wise. The pit will be on one side, Take the point of the knife and place into the pit carefully. The pit should pull out of a ripe avocado easily. Once you discard the pit, scoop out the flesh with with a spoon into a bowl.
2. Make it Green! As soon as you put the avocado into the bowl, squeeze lime juice onto the avocado flesh, it will prevent the avocado from turning brown.
3. Make it Chunky! I prefer guacamole with some texture so when mashing your avocado along with your ingredients don’t over do it. I like to use a fork for mashing.
4. Make it Last Minute! Make you’re guacamole close to when you are planning to serve. I am a big fan of making things in advance so that I can enjoy my guests but in this case you’ll forfeit the freshness and great color by preparing before guests arrive. Many times to make it quick and efficient , I have a bowl of all the ingredients prepared in advance except the avocado. When it’s time to eat , I just cut the avocado, scoop into the bowl, mix and serve.
A word about the ingredients:
I have a quick rule of thumb , 1 avocado per every 2 people and 1 lime per avocado
I start with a basic recipe. This recipe is cool and refreshing and works well for children and adults who don’t like the heat of the jalapeno pepper. I use this recipe also as a base to create different variations. My basic recipe is for 6 and makes about 3 cups :
3 Haas avocados, ripe
3 tablespoons lime juice
1/4 cup scallions, chopped
1/4 cup cilantro, chopped
1 teaspoon sea salt
In a medium bowl add the lime juice and sea salt , let the salt dissolve. Cut and remove flesh from avocado and place into bowl with lime juice /salt along with scallions and mash with fork. Add ingredients listed below depending on the version you are making and mix well. Keep refrigerated until ready to serve.
Make it Classic:
To the base recipe add 1 teaspoon jalapeno pepper, chopped.
Make it Red:
To the base recipe add 1 teaspoon jalapeno pepper, chopped and 1/4 cup chopped sun dried tomato
Make it Greek:
Make the base recipe but replace the cilantro with chopped mint and add 1/4 cup crumbled feta cheese.
Make it Blue:
Make the base recipe but instead of cilantro add 1/4 cup sour cream and 1/4 cup crumbled blue cheese.
Hope you enjoy your guacamole days!

Cooking with Rosemary

 blog rosemary

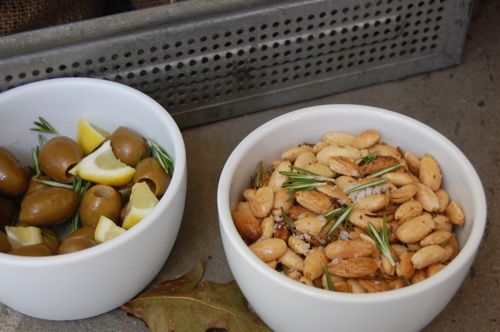
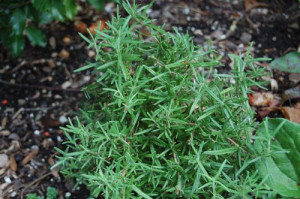
As the weather cools and my herb garden fades, I  still know that my favorite herb will still be available in my garden. My little rosemary bush is the  first to planted in the spring and is the last to leave me in early winter. I have it planted near my kitchen door so that I can just dash outside with my scissor to grab a few sprigs while cooking. Towards late afternoon on the weekends, I like to prepare for guests a little snack to go along with a great glass of wine and watch the sunset over the water.  So this time of year, when I am planning these snacks, I tend to use rosemary since it’s still available in the garden. I love the scent and taste of rosemary it evokes a combination of both the forest and the sea, much like the surroundings of my house. Fresh rosemary, which is my preference , looks similar to pine needles and when you chop the needles, the fragrance that is released is intoxicating! For the snacks start by getting some store bought olives, add rosemary, a squeeze of lemon juice and some small wedges of cut lemon, last drizzle with a little olive oil and the olives become much more special!  The other snacks I’ve made with rosemary are each delicious and quite different, one is roasted almonds, the next is a crostini using crushed cannelini beans on toasts and the last is a savory cracker. Each is a perfect compliment to wine.  Let’s raise a glass together to cheer for rosemary!

From by the bay, wishing you rosemary scented food memories!

Maryann


blog rosemary almonds
Roasted Rosemary Almonds


3 tablespoons olive oil

3 tablespoons chopped fresh rosemary

¾ teaspoon fine sea salt

¼ teaspoon cayenne pepper

2 cups raw whole blanched almonds

Additional coarse sea salt to taste

Directions

Preheat oven to 400 degrees F. Line baking sheet with aluminum foil. Heat olive oil in sauté pan add rosemary, salt, cayenne pepper and cook until fragrant – approximately 1 min.

Add almonds and coat and keep in the pan for another minute or two. Remove from heat and place on baking sheet in one layer. Bake for 10-12 minutes, stirring once. Remove from oven, sprinkle with additional coarse sea salt. Serve warm or at room temperature.

Variation:  Roasted Pecans

This will taste completely different but just as delicious. Using blanched almonds as they roast the almonds will fry in the oil.

Replace 2 cups almonds with 2 cups raw whole pecans.


blog rosemary crostini


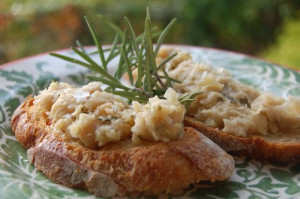
Rosemary Mashed Beans on Chili Toast

Serves 4

1 15.5 oz can cannellini beans, rinsed

4 tablespoons olive oil

1 tablespoon rosemary, chopped

1 teaspoon red wine vinegar

Coarse sea salt and freshly ground pepper

4 tablespoons grated pecorino cheese

Directions

In small pan heat 1 tablespoon olive oil, add the rosemary when fragrant approximately 30 seconds, add cannellini beans and sauté for approximately 5-6 minutes, mashing beans with the bottom of a wood spoon. Combine beans with red wine vinegar, grated pecorino cheese and remaining olive oil to loosen mixture slightly. Add salt and pepper to taste. Place bean mixture on top of toast. Serve.

Chili Toast

1 tablespoon olive oil

½ teaspoon chili flakes

½ teaspoon fine sea salt

4 slices ciabiatta bread

Directions

Preheat oven to 400 degrees F. Place bread on nonstick baking sheet, brush with olive oil and sprinkle the chili flakes and salt over the bread. Bake until golden brown approximately 8-10 minutes. Remove from oven and cool.


blog rosemary cheese coins

Rosemary Pecan and Parmesan Cheese Coins


1/2 cup grated parmesan cheese

3/4 cup all purpose flour

1/4 cup pecan flour

4 ounces unsalted butter  (1/2 stick), softened

1 tablespoon creme fraiche

1/8 teaspoon cayenne pepper

1/4 teaspoon fine grey sea salt

1 tablespoon rosemary, minced

1 to 2 tablespoons water


Directions

Pulse all ingredients except water in a food processor. Transfer to a bowl and sprinkle with 1 tablespoon of water. 

Form dough by squeezing with hands, adding more water if necessary.  Form dough into two logs approximately 1 inch in diameter. Wrap in plastic wrap and refrigerate for at least one hour. Preheat oven to 400 degrees F. Cut dough into 1/8 inch slices and place on baking sheets unlined. Place baking sheets in oven one on top rack and one on bottom shelf. Bake for 20 minutes in total until golden brown. Half way through switch baking sheets in the oven. Remove from oven and cool. Serve with wine or cocktails.


How to Dye Easter Eggs with Natural Food Ingredients

blog easter eggs dyedin basket
It’s worthy exploring again the use of foods from your refrigerator and spice cabinet to make these natural dye colored Easter Eggs.
From by the bay wishing you a Happy Holiday filled with cherished food memories!
Maryann
blog egg dye
Making the Perfect Hard Boiled Egg
Place eggs in the bottom of a large pot add water to just cover the eggs along with a little sea salt and place on medium heat. Bring water to a boil. Remove from heat and cover with a lid for 13 minutes. Use a timer to make sure you are not over cooking your eggs. Once the eggs are done, run them under cold water to cool to stop them from cooking. The result will be a perfectly cooked hard boiled egg.
A Few Suggestions While Coloring Your Eggs
To start I suggest using glass jam jars with covers or 16 ounce plastic deli containers with lids. Add the cooled hard boiled eggs to the natural dyes. Make sure eggs are completely submerged in the dye, add a little water if the eggs are not covered. Place a lid on your container and place into the refrigerator overnight for intense colors. If you want softer color you can let eggs sit in dye for just a few hours in the refrigerator. Add hard boiled eggs to the dye once cooled unless recipe says otherwise. When making the dyes, I suggest using plastic gloves so not to stain your fingers.
blog eggs
Natural Egg Dye Recipes
Red Beets / Pink Eggs  – Grate 4 tablespoons of red beets and add to a heat safe container. Add 1 teaspoon white vinegar and 1 cup boiling water. Let sit for 1 hour, strain and add eggs to dye.
Red Cabbage/ Blue Eggs – Add 3 tablespoons chopped red cabbage to a heat safe container. Add 1 teaspoon white vinegar and 1 cup boiling water. Let sit for 1 hour, strain and add eggs.
Annatto Seeds/ Reddish Golden Color – Add 2 tablespoons annatto seeds ( achiote seeds) to 1 cup of water, bring to a boil for about 5 to 7 minutes. Strain. Add eggs to the dye.
Red Cabbage and Turmeric Powder/ Green Color – Add 3 tablespoons chopped red cabbage and 1/2 teaspoon turmeric powder to a heat safe container. Add one cup of boiling water. Let sit for 1 hour, strain and add eggs. The result is a speckled color.
Turmeric Powder/ Deep Gold Color – Add 2 teaspoons ground turmeric powder to a heat safe container. Add  1 teaspoon white vinegar and one cup of boiling water. Once dye is cool add eggs . Rinse off any residual powder.
Paprika Powder/ Light Orange – Bring one cup of water and 1 tablespoon of white vinegar to a boil, add 1 tablespoon paprika and continue to boil for 15 minutes. Place in a heat safe container, add eggs to dye while warm. Rinse off any residual powder
Red Easter Eggs
Makes 6 eggs
6 white eggs, room temperature
skins of 6 large spanish or yellow onions
3 cups water
2 tablespoons white vinegar
1/8 teaspoon fine sea salt
1 teaspoon olive oil
In a medium ( 6 1/4 inch) sauce pan add the onion skins, water and vinegar. Bring to a boil. Reduce heat to simmer and place cover on the pan. Let simmer for 30 minutes.  Remove from heat and strain dye into a bowl and cool. The dye will appear orange, but it will yield red eggs. In the same medium sauce pan add the eggs in one layer. Cover with the cool liquid and add the salt. The eggs should be completely covered , if not add a little water until they are. Bring this to a low boil, reduce heat and cover the pan. Simmer no longer than 15 minutes. Remove from heat. Using a skimmer remove eggs and place on a wire rack to dry. Once dry, use a paper towel to rub olive oil on the eggs to give a glossy finish. Keep refrigerated until ready to serve. Serve cold or room temperature