Tag Archives: summer food

Pasta with Roasted Summer Vegetables

It’s after Labor Day, and the signs of fall are sadly arriving everywhere. Acorns are dropping onto the deck, leaves are gently falling into the pool, evening’s are getting a little cooler and the farmer’s market stalls are starting to fill with up with chrysanthemums and gourds. I am determined to savour the end of summer by snapping up in my shopping basket eggplant and summer squash. Once I arrive home, I enjoy the task at hand , figuring out what I’ll make with all that eggplant and squash. I came up with this easy pasta dish , which is light and delicious and uses alot of fresh eggplant and squash. Roasting vegetables in a little olive oil , can make the most finicky eater love vegetables. I chopped the vegetables into nice little cubes, toss with a little olive oil, thyme, salt and pepper and roast in the oven. Next, I saute until crisp some great quality slab bacon or pancetta also cut into cubes. Cook some pasta and use some grated cheese and you have a fantastic meal. Enjoy your last days of summer with some fresh vegetables and savour the moment!

From by the bay, wishing you memorable end of summer food memories!

Maryann

blog summer veggies
Pasta with Roasted Summer Vegetables
Serves Four
Ingredients
8 ounces dried pasta such as tagliatelle or thin spaghetti, cooked according to directions.
2 cups cubed eggplant
2 cups cubed assorted summer squash, such as zucchini
2 tablespoons olive oil
1 tablespoon fresh thyme leaves
4 ounces chopped good quality pancetta or slab bacon, cut into cubes
1 cup grated parmesan cheese
1 cup cooking water from pasta
fine sea salt and fresh black pepper to taste
Directions
Preheat oven to 400 degrees F. Dice your eggplant and summer squash into cubes, approximately 1/4 inch in size. Dice your bacon or pancetta into similar size cubes. Line two roasted pans with foil. Place the eggplant cubes on one pan and toss with 1 tablespoon olive oil, coating the cubes. On the second pan add the squash, thyme and remaining olive oil. Toss well coating the squash. Place both pans in the oven and roast in the oven for about 20 minutes until the vegetables become soft and start to brown. Watch the vegetables as cooking time could vary depending on the cube size. Remove from oven and place in bowl and keep to the side. While the vegetables are roasting in the oven take a medium saute pan and add the pancetta or bacon and cook until crisp. Drain on a paper towel. Cook the pasta according to directions. Just before straining the cooked pasta, reserve 1 cup of cooking water. Place the pasta in a bowl , add the roasted vegetables, bacon and cheese. Add some of the cooking water to make the sauce creamy. Add salt and pepper to taste and serve immediately.


blog zucchini pasta

Zucchini Salad with Toasted Pine nuts and Shaved Asiago Cheese

blog zucchini

Zucchini Salad with Toasted Pine nuts and Shaved Asiago Cheese
Serves Four
Ingredients
2 medium size zucchini
1/4 cup olive oil
juice of 1 lemon
1 teaspoon coarse sea salt, such as Maldon
1/4 teaspoon fresh ground black pepper
2 tablespoons pine nuts
2 tablespoons basil
Asiago cheese , shaved to taste
Directions
Place a dry small pan on medium heat, add the pine nuts and toast in pan until they start to brown. Remove from heat and keep to the side. Take the zucchini and cut off the ends. Use a mandolin or box grater to slice thinly the zucchini length wise. Place on platter. Dress with the olive oil,  lemon juice, salt and pepper. Mix well. Let sit at room temperature for at least 1 hour before serving, allowing the zucchini slices to marinate. When ready to serve, top with the pine nuts, basil torn into pieces and the shaved Asiago cheese and then serve.

blog zucchini salad


Julia’s Crabcakes with Cilantro Mayonnaise

blog best ever


Each summer our family would visit my mother’s sister Julia and her family at the Jersey shore. It was a big treat for all of us. We would spend our time running around outdoors and then come in to a wonderful meal. What better summer seaside meal then crabcakes. My aunt served them with tartar sauce and lemon.  So when my mom finally got around to getting the recipe, she named the crabcake as Julia’s Crabcakes (best ever made). This is no exageration. I didn’t  touch my aun’t recipe for the crabcakes. How can you improve on the best ever made?  I did add some cilantro mayonnaise and placed on a bed of sauté red peppers with fresh corn,  Yum!

From by the bay wishing you the best ever made food memories!
Maryann

blog crabcakes


 Julia’s Crabcakes with Cilantro Mayonnaise

Serves 4

1 lb lump crabmeat, pick for cartilage

2 eggs beaten

2 tablespoons finely chopped onion

1 tablespoon finely chopped red bell pepper

1 tablespoon prepared mustard

¼ teaspoon Worchester sauce

½ cup bread crumbs

3 tablespoons mayonnaise

Juice of ½ a lime

½ teaspoon black pepper

6 tablespoons unsalted butter

Cilantro leaves to garnish

Directions

It’s very important that the lump crabmeat is very well picked over for any cartilage. Add to a bowl. In a small sauté pan use 1 tablespoon of butter and sauté the onion and pepper until very soft. Add to the crabmeat. Add the remaining ingredients except butter into the bowl. Form 8 crabcakes patties. Place on a tray and cover with plastic wrap. Keep in the fridge for an hour. Using a large skillet, melt butter and sauté  cakes until golden brown. Place on a bed of the red pepper and sweet corn sauté, add a little cilantro mayonnaise to the top of each cake and a few cilantro leaves. Serve remaining cilantro mayonnaise to the side.

Cilantro Mayonnaise

2 tablespoons olive oil

1 clove garlic minced

2 tablespoons water

6 oz cilantro leaves

1 cup store bought mayonnaise

Juice of 2 limes

Zest of 1 lime

5 drops Tabasco

Directions

In a food processor combine olive oil, garlic and water. Add cilantro and puree. Add mayonnaise, Tabasco lime juice and zest and blend again. Remove and place in glass jar cover and refrigerate until ready to serve with crabcakes.

Mango and Honey Glazed Spareribs

Living and working in Manhattan is one of the best experiences in the world. There are however, tradeoffs around the contraints of apartment living. For someone like me,who has a passion for cooking, a small city kitchen requires alot of creativity and organziation. Entertaining in small spaces can be challenging. So when I bought my house by the bay, among the many wonders this house had to offer such as sweeping views of the water, open spaces, a great kitchen, there was one feature that I had no idea how much I would love.  Wait for it …….a walk in pantry. I love my pantry! Just keeping it stocked with interesting food items is fun. My souvenirs from traveling are now often food to place onto my pantry shelf in anticipation of creating some new dish. When I start thinking about a recipe I walk into the pantry and rummage through the shelves looking for ingredients to inspire me. The recipe below for Mango and Honey Glazed Spareribs is one such recipe. I always have some of Major Grey’s Mango Chutney on my pantry shelf.
Major Grey’s chutney is a combination of mango, lime juice, raisins, tamarind, onion and spices.  My dad loved this chutney and it’s exotic taste. I pulled the chutney off the shelf because it was getting close to the expiration date ( this is a whole other aspect of pantry living, managing to expiration dates ).  I used the chutney as the base to my glaze and the results were amazing.

From by the bay wishing you lovely chutney food memories!
Maryann

blog spare ribs


Mango and Honey Glazed Spareribs

Serves 4 as main course or 8 as appetizer

2 ½ lbs. racks baby back ribs

2 cloves garlic, minced

1 tablespoon fresh ginger , grated

½ teaspoon cayenne pepper

3 tablespoons dark brown sugar

¼ cup honey

¼ cup vermouth

½ cup soy sauce

6 ounces mango chutney

Directions

Combine all ingredients into a plastic sealed bag. Place in refrigerator for at least 6 hours or better overnight. Preheat oven to 400 degrees F. Line a large baking dish with aluminum foil and empty the entire contents of the plastic bag into the dish. Arrange ribs in pan in one layer. Place in oven and turn every 15 minutes as the ribs brown. Bake for approximately 45 minutes. Tranfer ribs to cutting board and let stand 5 minutes before cutting.

Sometimes I use country style ribs for this dish, in which case the cooking time is a little longer 1 hour. The meat literally falls off the bones – it delivers great favor and is more economic.

Tip: keep handy in the refrigerator tubes of garlic and ginger paste. They are available in Japanese specialty food stores. They are perfect for making quick marinades – without compromising the taste.


Brisket with Cola Barbecue Sauce

I have been intrigued with cooking with cola and other soft drinks ever since I first read about it – which was in the Nigella Lawson’s book “Nigella Bites”. Leave it to me to learn about Southern cooking  from a British food writer.  I started to experiment with barbecue sauce and the result is this jazzed up version for brisket. It’s a great way to entertain a crowd with big flavor and little work. The sweetness of the cola permeates the brisket which is then perfectly balanced with the acid coming from both the Balsamic vinegar and Worcestershire sauce. You will find yourself making dish over and over again. Yes, it’s that good!

From by the bay wishing you sweet cola food memories! Maryann

blog cola brisket

Brisket with Cola Barbecue Sauce

Serves 6

3 pounds brisket

3 cups cola barbecue sauce

Directions

Place brisket overnight in a sealed plastic bag along with the barbecue sauce. Next day, preheat oven to 275F. Empty the contents of the plastic bag into a Dutch oven include all the sauce. Cover with lid and place in the oven for approximately 4 hours. Brisket takes approximately 1 hours and 15 minutes per lb to cook. Remove from oven. Using two forks pull the meat apart and shred into the remaining sauce. Combine and serve. This can also be served as a sandwich using either fresh rolls  and coleslaw or as a soft taco along with some sour cream. 


Cola Barbecue Sauce

Makes 3 cups

12ozs. Cola

1 ½ cup ketchup

4 garlic cloves, smashed

5 bay leaves

¼ cup balsamic vinegar

¼ cup Worcestershire Sauce

1 teaspoon smoked paprika

1 teaspoon fine sea salt

¼ teaspoon chili flakes

5 bay leaves

1 tablespoon fennel seeds

2 tablespoons fresh thyme, chopped

2 tablespoons fresh rosemary, chopped

Directions

In a medium saucepan bring all ingredients to a boil, then reduce heat and simmer for 30 to 45 minutes , sauce will thicken . Cool and use with steak, chicken or pork.

Note: no diet cola for this – the sugar is essential to the taste of the barbecue sauce.


Lobster Roll with Tarragon

Last weekend I had guests out from the city visiting by the bay. So when I was thinking about  what to serve my friends so that they could really experience the waterside, of course lobster came to mind, the quintessential waterside dish. I love lobster rolls and I make it many different ways. Sometimes I just want the simplicity of fresh lobster meat , a toasted roll and melted butter and it’s delicious. This weekend I wanted to kick up the ingredients for my lobster salad with Old Bay Seasoning to add warmth to the taste of cool mayonnaise, fresh herbs such as parsley and the slightly licorice flavor of tarragon and  a touch of fresh lemon juice to brighten all the flavors. My friends were taking the train from Penn Station, I told them to come early and I would pick them up in Port Washington and we would head over to the pier to buy some fresh lobsters. Once by the bay, I steamed the lobsters and made my salad. After a walk to the beach, we came back to have a terrific lunch of lobster rolls on the deck. What a perfect day!

From by the bay wishing you perfect waterside memories!
Maryann
blog lobster roll


Lobster Roll with Tarragon

Serves 6

6 cups chilled lobster meat from 4 – 1  lb steamed lobster cut in chunks

½ cup celery, chopped fine

2 tablespoons scallions, chopped

¾ cup fine store bought mayonnaise

2 tablespoon Dijon mustard

4 tablespoons lemon juice

4 tablespoon fresh tarragon, chopped

4 tablespoons Italian parsley, chopped

1 teaspoon Old Bay Seasoning

1 teaspoon fine sea salt

1/4 teaspoon ground black pepper

Pinch cayenne pepper

6 brioche rolls, top split

1/2 cup unsalted butter

Directions

To a bowl add lobster, scallion and celery. In a separate bowl , whisk together mayonnaise, mustard, lemon juice, tarragon, parsley, old bay seasoning, salt , pepper and cayenne pepper. Pour over the lobster mixture. Blend well. Place in refrigerator covered until ready to use.

Melt butter and brush the insides of the roll. Toast in a 400 degree F oven 4 minutes until golden brown. Fill buns with lobster salad and serve.

Fresh Corn with Shrimp and Grits

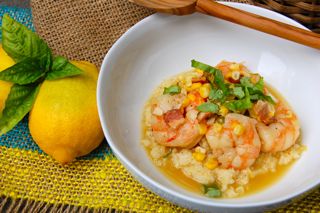
I got up early the other morning and when straight to the farm stand. I just love this time of year, especially the corn. I found some beautiful ears of butter and sugar corn which is a mix of yellow and white kernels. I wanted the corn to be the star of my dinner that night so I decided to make shrimp and grits. In order to have the delicious corn taste enhance each part of the dish, I shucked the corn to mix into the dish at the end and also make a corn stock that I used to make the sauce for the shrimp as well as to cook the grits. I finished the dish off with some fresh basil from my garden. The results were terrific. Don’t be daunted by the steps, they are all easy and go quickly, so definitely try it out.

From by the bay wishing you butter and sugar food memories!
Maryann
Tip: when shucking the corn, I place a large bowl in the skin and shuck the corn instead the
bowl, with a knife. This makes for an easy clean up afterward.
blog corn shrimp grits
Fresh Corn with Shrimp and Grits
Serves 6
Ingredients for stock
6 large ears corn, shucked, kernels and cobs separate, keep 1 1/2 cups corn kernels for shrimp
4 cups store bought low sodium chicken stock
1/2 cup white wine
Directions for stock
In a stock pot add all ingredients and bring to a boil. Simmer for 10 minutes. Remove from heat and cool. Remove the cobs from the stock and discard. Place remaining stock and corn into food processor and puree. Strain and keep stock to the side. You will have about 3 1/2 cups of stock. If you have less use less stock in the grits and add more water.
Note: This can be done in advance, earlier in the day.
Ingredients for grits
1 cup stone grounded grits
2 cups corn stock
2 cups water
1 teaspoon fine sea salt
1/2 teaspoon black pepper
1/4 pound unsalted butter
1/4 cup grated parmesan cheese
2 tablespoons corn stock  or olive oil optional
Directions for grits
In a large sauce pan  4 cups of liquid in total – add stock, water, salt and pepper. Bring to a boil. Add grits and cook uncovered for about 20 to 25 minutes until liquid is absorbed into the grits, stirring occasionally so grits don’t stick to the bottom of the pan. Remove from heat and add the butter and cheese, stirring well. Optional : Right before serving add 2 tablespoons of the corn stock or olive oil  to loosen the grits.
Ingredients for shrimp
2 pounds shrimp cleaned and deveined
4 ounces thick cut bacon, chopped into cubes
1 1/2 cups fresh uncooked corn kernels
1 garlic clove minced
2 tablespoons green onion, chopped
1 1/2 cups corn stock
4 tablespoons fresh lemon juice
2 tablespoons basil, chopped
Directions for shrimp
Place a large saute pan on medium heat  and add the bacon and cook until crisp. Use a slotted spoon to remove the bacon and drain on a paper towel. Set aside. In the same pan saute the shrimp until they turn pink, cooking on both sides. Do not over crowd the pan. Remove the shrimp and set aside. Leave about 1 tablespoon of the bacon fat and add the garlic, green onion and corn. Saute for about 2 minutes until softened, then add the corn stock and lemon juice bring to a boil and add the shrimp and bacon, mix well and remove from the heat. Serve on top of the grits and top with chopped basil.


Cilantro and Pistachio Couscous

Looking for that quick reliable side dish? Stop looking and make couscous the dish. I always have some sitting on my pantry shelf. It’s easy and delicious side dish that can be make in advance and served at room temperature . It’s perfect for summer menus. Below is a basic recipe I use, but it’s easy to get creative. For example,  pistachios can be replaced with walnuts, pine nuts or pecans. The cilantro can be replaced with other leafy green fresh herbs such as mint or basil. You can add dried fruits or even fresh corn or berries. I suggest adding to your pantry today and  to your menu this week .

From by the bay wishing you delicious couscous memories!
Maryann

Cilantro and Pistachio Couscous

Serves 6

1 ½ cups couscous

1 ½ cups boiling water

½ cup pistachios, chopped

½ cup fresh cilantro, chopped

1 tablespoons fine sea salt

½ teaspoon ground cumin

½ teaspoon ground coriander

6 tablespoons olive oil

3 tablespoons fresh lemon juice

Olive oil and cilantro leaves to garnish

Directions

In a large bowl place couscous, cover with boiling water and then cover the bowl with plastic wrap. Let bowl sit for 10 minutes. Remove wrap and using a fork lift the couscous to make fluffy. Add the remaining ingredients and mix well. This can be served immediately or at room temperature. Just before serving add a drizzle of olive oil.

Short Rib Burger with Rosemary Onion Jam

I have a bit of a competitive streak when it comes to cooking. Each year we have an outdoor grilling get together where we try to out do one another for the best burger recipe. This year I went for a burger made of ground short rib. Short rib has just the right fat ratio for a juicy burger. Next, I made some vidalia onion jam as a topping that along with melted smoked cheddar cheese, crisp cooked pancetta and a little arugula made for a real winning burger! Try it for your next cookout and get rave reviews!
From by the bay, wishing you winning food memories!
Maryann

blog onion jam


Rosemary Onion Jam

Ingredients
2 tablespoons olive oil
3 large vidalia onions, chopped
3 tablespoons brown sugar
2 tablespoons balsamic vinegar
2 tablespoons red wine vinegar
2 teaspoons fine sea salt
1 teaspoon fresh ground black pepper
3 springs rosemary, leaves chopped
Directions
In a medium sauce pan heat olive oil and add onions and sprinkle with salt and pepper. Saute onions until soft, about 15 minutes, stir so that onions to not burn. Add the remaining ingredients and continue to saute until onions are brown and the consistency is jam like. Remove from heat and cool. Place into a jam jar until ready to use. If not using within a few hours refrigerate. Bring to room temperature before using.
blog onion jam burger
Short Rib Burger with Rosemary Onion Jam
Serves 6
Ingredients
2 pounds ground short rib
6 sesame seed buns
6 slices smoked cheddar cheese
6 tablespoons onion jam
12 slices pancetta cooked, crisp
4 ounces baby arugula leaves
Directions
Cook burgers , as preferred. Cut rolls through middle and toast. Add the cheddar cheese to top of burger and melt. To assemble place some arugula to the toasted bottom of the bun. Place burger with cheese on top of the arugula. Top with the onion jam and then the cooked pancetta. Finish with the toasted top of the bun and enjoy!

Summer Agua Recipes

I just returned from a vacation visiting San Francisco and the surrounding areas. I highly recommend it! While shopping, I was struck by the number of small shops offering fruit flavored water to their guests. After buying so many bottles of fruit flavored water, I loved the idea of making my own.  When I returned to by the bay on Long Island, I did a little research. I discovered that agua fresca is Mexican in origin, frequently found in the traveling street markets, used to tempt shoppers. One of the most popular agua is made with watermelon. I quickly bought some watermelon and oranges to make my own flavored waters for the weekend. I am using less sugar then usually suggested in these recipes, as it’s my preference to have the water be less sweet and really taste the fruit flavor. The first recipe is for a watermelon agua, you could easily switch out the watermelon for cantaloupe or strawberries. The second recipe is for an orange flavored water. I am thinking to experiment next weekend making fresh ginger with the cantaloupe or cucumber water with mint. There are endless possibilities. Both recipes below are fantastic and it’s a great way to beat the heat!

From by the bay wishing you fruity food memories!
Maryann
blog watermelon water
Watermelon Agua (Water)
 Ingredients
3/4 pound watermelon, diced without the rind
4 cups water
2 tablespoons fine granulated sugar
juice of one lime (optional)
Directions
In a  food processor add the watermelon with 2 cups of water and puree. Strain into a bowl. Add the remaining 2 cups of water , sugar and lime juice. Mix Well. Place in a jar and refrigerate until cold before serving.
blog orange water
Orange Aqua (Water)

Ingredients
1 inch piece of orange zest
2 oranges peeled and quartered
4 cups water
2 tablespoons fine granulated sugar
orange slices
Directions
In a food processor add the oranges and zest with 2 cups of water and puree. Strain into a bowl. Add the remaining 2 cups of water and sugar. Mix well. Place in jar along with orange slices and refrigerate until cold before serving.