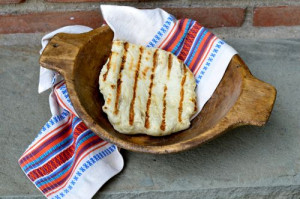
It’s summer and one of the perfect canvases for a summer meal is the reliable pita bread! Let’s all remember my mother is Greek!! Last weekend, I decided to tackle homemade pita bread, thinking it was a big chore and difficult to do, much to my surprise it was super easy. I know you’re thinking really how is this easy? It’s 5 steps – measure, mix, rise, pull and grill. If you are like me , how many times have you watched Bobby Flay make flatbread or pizza or pita on the grill and wonder how is this not a mess. I’m here to tell you , Bobby speaks the truth when he says it’s easy. The key is to put the dough on the grill and let it bake a a minute or two. The dough pulls away naturally once it’s baked. The taste of home made pita is so superior to store brought you will want to give this a try! I’ll have a few recipes coming up that is the perfect complement to homemade pita! Yum!!
From by the bay, wishing you perfect pita food memories!
Maryann
Home made Pita Bread
Adapted from mygreekdish.com as posted by Eli K. Giannopoulo
Ingredients
- 17 1/2 ounces all-purpose flour
- 1 teaspoon dry yeast
- 1 tsp salt
- 1 tsp sugar
- 1 1/2 glass of lukewarm water (40C)
Instructions
- To prepare this pitta bread recipe start by sieving the flour into your mixer’s bowl. Add the yeast, sugar and salt and blend with a spoon.
- Add a little bit of water and start mixing, using the dough hook. Pour in the water a little bit at a time, at a steady stream, whilst mixing. Wait each time for the water to be absorbed and continue adding some more.
- Depending on the flour, the dough may or may need a little bit less water than this pita bread recipe calls for. After mixing for a while, the dough for your pita bread should become an elastic ball. If the dough is still crumbled, you should add some more water. If it becomes too sticky, this means that you added more water than needed. In that case, add 1 tsp of flour and continue mixing.
- When done, cover the dough with plastic wrap and let it sit in a warm place, for at least 1 hour, until it doubles its size. This is an important step for this pita bread recipe, so that the pita bread becomes fluffy and soft.
- Take the dough out of the bowl and knead a little bit with your hands. Split in 6 evenly sized portions.
- To form the pita bread, you can either use a rolling pin, or stretch it with your hands for a more rustic look (and my preference actually ), about 1/4 inch thick.
- Heat an outdoor grill. Put the stretched dough on the grill and close the cover. Let bake a minute or two and flip the bread. Grill another minute and remove. If you don’t want to use the grill – heat a non-sticking frying pan to medium-high heat (with no grease) and fry each pita bread for about 3-4 minutes on each side, until slightly colored and still soft. To give more color, push the pita bread with a wooden spoon on the pan. Remove the serve.

